Showing posts with label 1931. Show all posts

Friday, February 10, 2012

1931 Chevy 5 Window Coupe


This is a video we took the first time I ever drove the car.  It had a bit of a death wobble in the front end but I ironed that out later.  It was an amazing feeling driving something that I built from a truck that was buried in the dirt for about 50 years.


This is the Coupe right before we started sanding it for paint.  I took it out for a test run and the torque converter went out.  I took these pictures after it died.

I was trying to get this car ready for the Glendive car show and the converter went out about 3 days before the show.  So I pulled the engine and transmission, replaced the converter, installed the red lexan windows, sanded and painted the body and put the floor in in 3 days.  Needless to say I made it to the carshow.

Tara made the seat cover for me.


This is a 30's Pontiac dash

These are a couple of the pictures they used in the Rebel Rodz magazine that I had a 2 page layout in.

Friday, February 3, 2012

1931 Chevrolet 5 Window Coupe Body

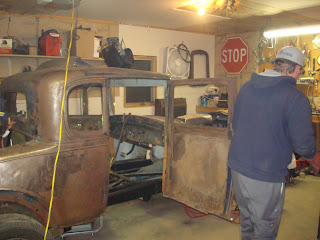
I set the body up on the firewall, it is the easiest way to square it up.

Here I started adding steel structure to the inside of the body.  Old Chevy's had wood for the body framing.  They basically made a wood frame then wrapped it in metal.


Here is the body before I chopped the roof about 4 inches.

After the chop.

You can see here the fiberglass trunk lid I bought from Speedway Motors, then I made the panel above and below the lid.

Monday, January 30, 2012

Chevy Coupe Frame Fabrication and Painting, Suspension

Here I added some crossmember bracing, sometimes called x-members because of their shape. 

I then added some Ford Mustang springs and Speedway Motors spring mounts. 

Here the frame is upside down for painting.  You can see the 4 link mounts that I welded up.


Tara bought me the headers for Christmas.

I just like these two black and white photos.


These last four are out of order but, they show the body channeled over the frame 6 inches and what it looked like before the channel job.


Unchanneled

Channeled
You can see why I said earlier I should have taken more out of the frame length, it looks funny.

Saturday, January 28, 2012

Sandblasting, Frame Preparation, Shortening the Frame


Here is the 27' Chevy frame back from the sandblaster.  I think it cost me about $200 to get it blasted.

Here I have the sections of the frame marked out to remove.  I later found that I should have taken about 7 more inches out so that the proportions of the car would look correct.  You live and learn.


I used a reciprocating saw and a grinder with a cut-off wheel to cut the sections out of the frame.  I step cut it so that I would have more surface to weld and the lower cut will support the upper cut.

I made sure to weld cross braces from side to side to make sure the width of the frame stayed the same.

Here the frame is welded back together.  What I learned later on is I should have welded gusset plates on the inside of the frame rails over the cut sections.  My thinking at the time was that when I boxed the frame that would give it enough support.  It ended up being fine but now I always gusset stress areas.