Showing posts with label Hot Rod. Show all posts

Tuesday, June 12, 2012

Bird Car Part 2


So this is what has been taking up a lot of my free time lately.  I had a 77' T/A when I was in high school, so I have always had a soft spot for the "Bird Car" as my niece used to call it.


This is a 1978, with the 6.6 or the 400 Pontiac engine in it.


I had been looking for a T-top, 4speed but the condition of this car made it a no-brainer to buy.  So, a coupe/automatic it is.


This is what my father in law is going to see a lot of through the windshield of his 68' Chevelle :)  This Pontiac had a lot of engine work done before I bought it.

Wednesday, March 7, 2012

Whippet Progress

So I was able to let the flathead go through a heat cycle so I could re-torque the head studs.  It's got a bit of blowby.  It needs to have a rebuild in the near future.  I will just baby it for the summer and maybe go through it next winter, otherwise it runs great.  Oil pressure stays at about 5 psi at idle and goes up to 20 at higher rpm.  Flatheads are known to have low pressure.  The temp stayed right around 180 so that was good. 

The V-man was digging the progress

I took a headlight bar I had and butchered it to fit.  It turned out pretty good, I just mounted it to the F-1 Shock Mounts.  The Headlights are a pair of 30-31 Ford Model A's with a sealed beam conversion.

I finally figured out that on a positive ground electrical system you need to positive ground your electric fuel pump as well.

For the shifter linkage I picked up some solid round bar.  I heated the ends of the two pieces I cut and bent them at 90 degrees.  This end goes through the hole on the shifter.

I then just strong armed the bars with a pipe bender to the shape they needed to clear each other and to smoothly shift through the gears.  Then I just drilled holes through the bars and slid them over the transmission shift levers.

I finally found a use for the vintage Hamms can I had laying around.  It's now the radiator overflow container.

I finished up the dash with the guages, switches and an ash tray for a smoking habit I don't have...I just thought it looked cool.
I also got the front toe board installed.


Friday, February 17, 2012

1929 Willys Whippet Mercury Flathead on Model A Frame


Recently I made the pedal linkage for the Whippet.  The pedals are from some kind of early Chevy that I found in a junk pile somewhere.  I used a clutch shaft from a 1946 Ford, I ordered it from Vanpelt sales but it is an OEM part.  The clutch is a bit hard to push in but it seems to work ok.  A 40’ Ford had longer pedals for a easier pedal ratio.

If I could give any advice on two carb setups for flatheads, it would be don't use the Edelbrock Super Dual.  I ended up having to offset the generator by using an Offy offset bracket that I got from Speedway Motors.  Then I had to invert one of the water necks and get a longer upper radiator hose to fit around the generator.  Then the inlet on the front carburetor is very tight to the side of the generator.

I made up these hose adapters for the lower radiator outlets to the water pumps.  I used 1x2 rectangular tubing and some round tubing because rubber hoses don't bend that sharp.

I ended up using an old dropped axle I had on the front.  I bought a Posies reverse arch front spring from Speedway, along with new perches and shackles.  I hate the cheap bushings they send with the shackles though, they shatter like glass if you are too rough on spring installation.

I used the Speedway complete brake line kit to run all the brake lines.  It worked well but I had a lot of left over brass parts that I paid for and didn't need, but they come in the kit.

I ran the front hard lines under the front crossmember.  I later put a T in the center.

I sourced this in-line 6 volt electric fuel pump from O'reilly auto parts.  I had a vintage Autopulse fuel pump installed because it looked cool but, apparently today's gas has alcohol in it and turns the rubber diaphrams of the vintage pump into silly putty, then sprays gas like a sprinkler.

I should be sponsored by Speedway or something, I got this poly 10 gallon tank from them as well.  On my last car I used an old steel tank.  It took me 2 days of cleaning the inside, then I had to seal it and wait a few more days to even test it, so this was way easier.

So last weekend I tried to fire the Flathead up but the rings wouldn't seal in the cylinders.  So I soaked them in Marvel Mystery Oil for a few days.  The oil makes the rings expand.  The oil also makes it smoke like crazy until it all burns off as you can see in the video.  I had to shut it down because I didn't have an oil pressure gauge or temp gauge.  Runs pretty good for an engine that sat in a truck seized up for about 30 years.

Wednesday, February 15, 2012

1929 Willys Whippet Progress Pics

Bought some sheet metal and took a stab at forming my first decklid, it didn't turn out too bad.  It would have been much easier with a shrinker/stretcher.  I just made a million notch cuts and slowly bent it then welded it to hold the shape.

These are Ford F-1 shock arms.  I made some brackets for them to bolt too.

I then made some  mounts for the lower  part of the shock and welded them to split wishbones.  (I might need to move the mounting hole to the inside because the tires rub the metal).  Now I know.

I slowly made the floor pans.  I had to make templates then go cut out the metal with a plasma cutter. 


The little hatch to the left is to fill the brake system through the master cylinder.  The slot is for the transmission shifter.

I cleaned up the frame and painted it.  Started the semi-final assembly.  If I keep the car I will probably take it apart and fix the stuff I hate after I drive it for awhile. 

Sunday, February 5, 2012

Val and Glasgow Mt, 1933 Ford 33' Plymouth

So yesterday I made the 3-1/2 hour trip to Glasgow Montana to get a 1934 Ford Frame for my new 33' Ford Pickup project.  My friend Jerry also lives there so it was a trip well worth the drive.  After I picked up the frame Jerry and I went on a hot rod  tour of Glasgow. 

We started at Jerry's where he showed me a picture of a car I was told about by my father when I was in high school.  I have been looking for this car ever since my dad told me about.  Needless to say I still haven't found it.  I was amazed to see that Jerry had a picture.

Larry Deal owned the car, that is Murk Mansel in the passenger seat.  This picture was taken in April of 1963.
Jerry has got a 70' Mustang Mach 1 that he bought new, it has 16,000 original miles on it.  The car looks brand new, it still has the original tires on it!  I'm kicking myself for not getting a picture of it, it's unbelievable.

Here is a couple pics of Jerry's 33' Ford coupe I just might sell parts of my body to obtain, he fits 5 vehicles in his garage so it was a little cramped.


We cruised around town saw a couple rat rod projects and the front engine dragster seen below.
It doesn't have the engine in it right now but, it ran a 292 straight six...crazy.
This is at the Malta 1/8th mile track.

Here is another 33' Plymouth that a guy in glasgow is building.
I also met this guy Stormer, he sells rc cars on the internet and drag races.  He has some cool stuff on youtube, but here is his drag car.  It's a 4 cylinder...crazy.


Friday, February 3, 2012

1931 Chevrolet 5 Window Coupe Body

I set the body up on the firewall, it is the easiest way to square it up.

Here I started adding steel structure to the inside of the body.  Old Chevy's had wood for the body framing.  They basically made a wood frame then wrapped it in metal.


Here is the body before I chopped the roof about 4 inches.

After the chop.

You can see here the fiberglass trunk lid I bought from Speedway Motors, then I made the panel above and below the lid.

Wednesday, February 1, 2012

1929 Willy's Whippet, Ford Model A, Mercury Flathead,Frame Fabrication, Body Channelling, Pinion Angle, Firewall Reversal

Setting up the front suspension.  I am going to make what is called a "suicide perch" for the front axle.  If it were to fail the frame hits the ground, hence suicide.

Just a shot of how I connected the rear suspension and the rear frame section that I made.  The wheelbase is longer than a Model A and on a Model A the rear spring is directly above the rear axle.

I cut the frame horns off the Model A Frame and removed the front stock cross member, both items that easily get you a couple hundred bucks on ebay.  Money toward the project!


Here I set the pinion angle at +3 degrees for suspension compression under acceleration.
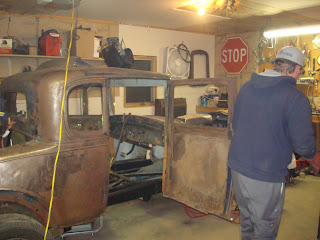
Here I have the body channelled 6 inches over the frame.

You can see the first part of the front spring perch welded on.  I later add bracing to it.

A closer view of the semi-finished suicide spring perch.  I made it tall to get the car low to the ground.

I removed the firewall to reverse it and give me the engine bay clearance I need.  Reversing is just flipping it around.

Here the firewall is reversed and welded in.  The hole in the side of the cowl is for the cowl steering which I will show later.  I cut the tops of the doors off, welded the doors shut, removed the windshield sun visor, and chopped the windshield frame about 3-1/2 inches.

I have the driver side door top folded over, you can see the original height on the passenger door waiting to be done.

Monday, January 30, 2012

Chevy Coupe Frame Fabrication and Painting, Suspension

Here I added some crossmember bracing, sometimes called x-members because of their shape. 

I then added some Ford Mustang springs and Speedway Motors spring mounts. 

Here the frame is upside down for painting.  You can see the 4 link mounts that I welded up.


Tara bought me the headers for Christmas.

I just like these two black and white photos.


These last four are out of order but, they show the body channeled over the frame 6 inches and what it looked like before the channel job.


Unchanneled

Channeled
You can see why I said earlier I should have taken more out of the frame length, it looks funny.